How to Farm and Build Datacrons in SWGOH
The system I use every month to get the datacrons I need for GAC in Star Wars Galaxy of Heroes, from deciding how much a set is worth to cleaning up my best level 9s.
Watch the walkthrough: I recorded myself going through Datacron Set 35, Duty and Defiance, on my own account, from Conquest all the way to a finished Starkiller level 9. Watch it on YouTube. This is basically the written version of that process.
A new datacron set comes out every month, and the good sets can absolutely decide GAC fights. They can also become a massive time and crystal sink if you let them.
The other thing to remember is that datacrons are temporary. They are a constant revolving door with no lasting value to your account. Whatever method you choose, I think it should be something you can apply consistently every month.
I'm not a huge efficiency player when it comes to datacrons. I'm trying to balance real life, everything else happening in SWGOH, and still getting enough good datacrons to stay competitive in Kyber 1.
This isn't the mathematically perfect way to farm every possible datacron. I don't have the time or patience for that. This is just the system I've settled into that works for me.
The basics
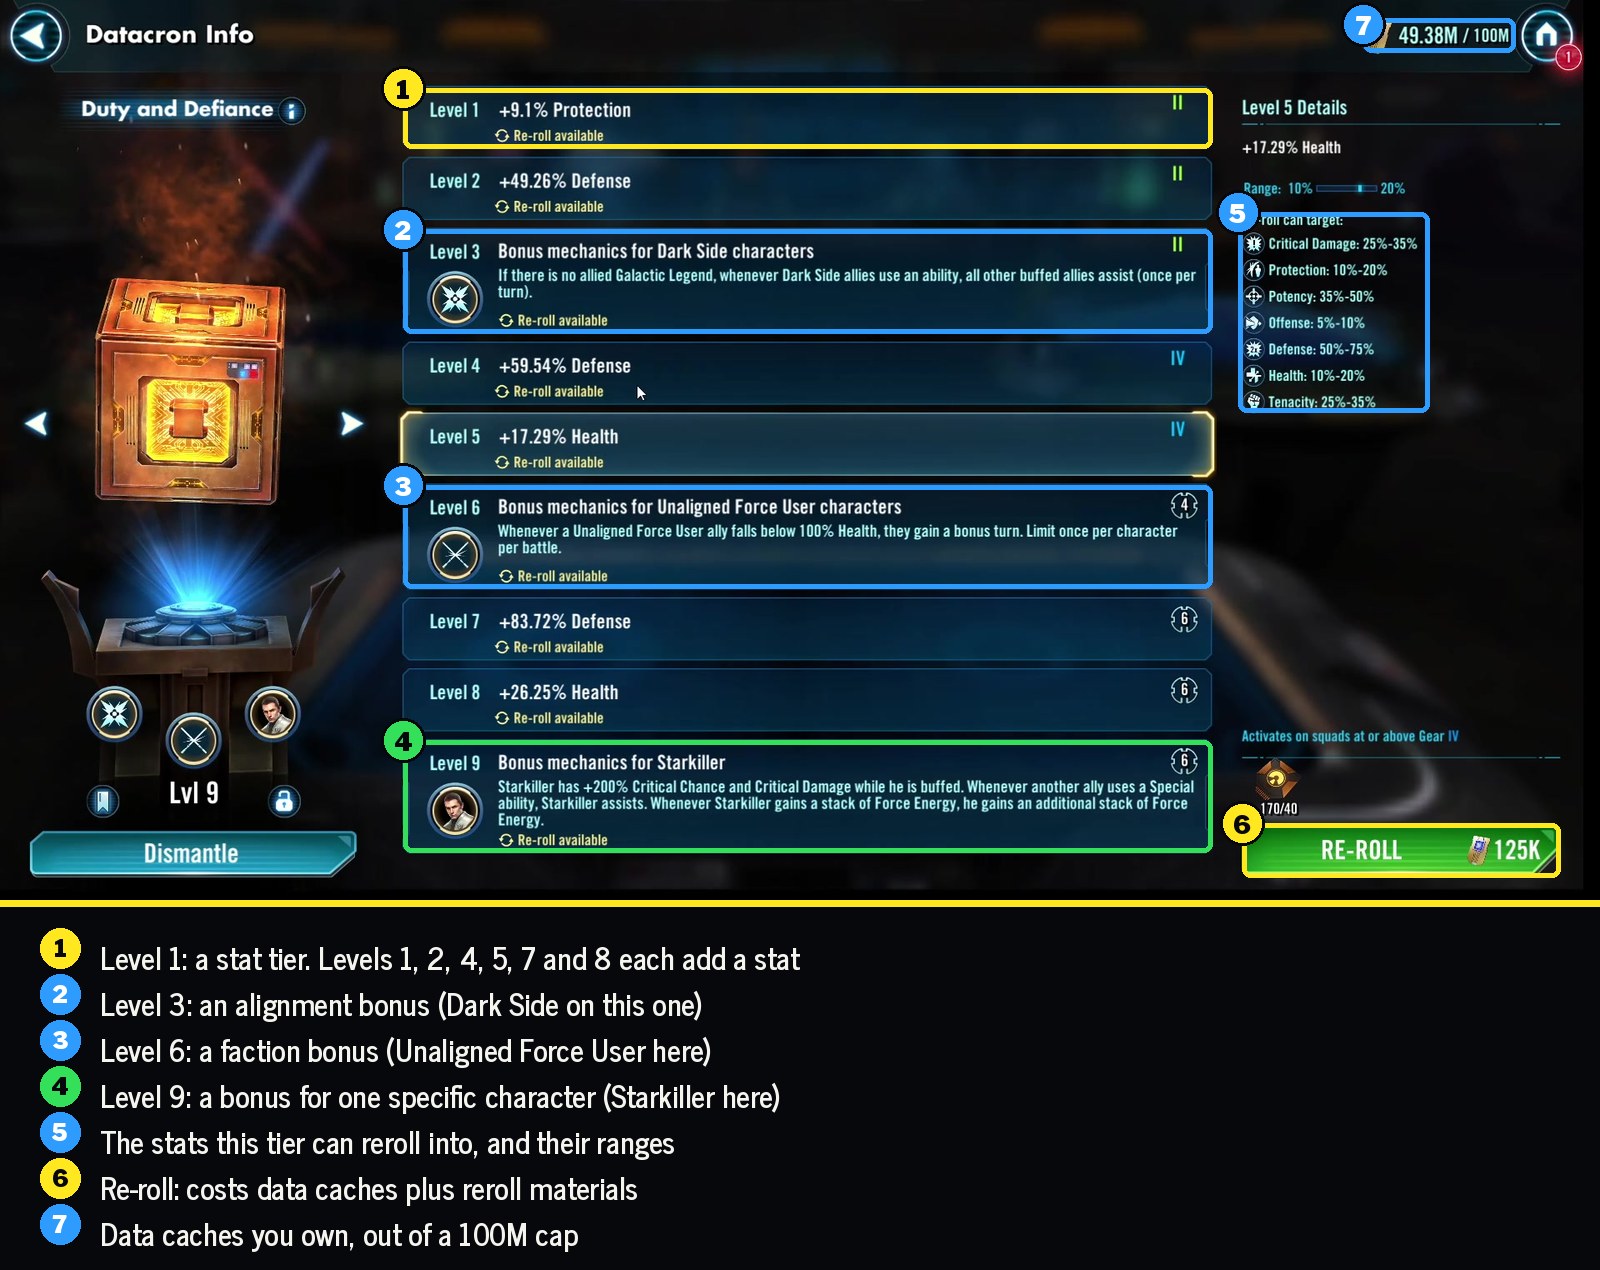
- Datacron set. A new set comes out every month with its own bonuses. Older sets stick around until their expiration date and then disappear.
- Levels. Datacrons go up to level 9. Levels 1, 2, 4, 5, 7 and 8 give you stats like Defense, Crit Damage, Health and Protection.
- Level 3, 6 and 9 bonuses. Level 3 is an alignment bonus, level 6 is a faction bonus, and level 9 is tied to a specific character.
- Data caches. The currency used to level datacrons and pay for rerolls.
- Reroll materials. Additional materials used when rerolling.
- Shard Store Tokens. Excess shards and blueprints can be converted into these and then spent on the Datacrons tab for datacrons, data caches and reroll materials.
- Rerolls. Rerolling gives you new options for that level. You can keep the original roll if you don't like the new ones, but you're still paying the reroll cost.
- Dismantle. Break down datacrons you don't want and get some materials back.
Most of this happens under either Inventory > Datacrons or Shipments > Datacrons.
Step 1: Decide how important the set actually is
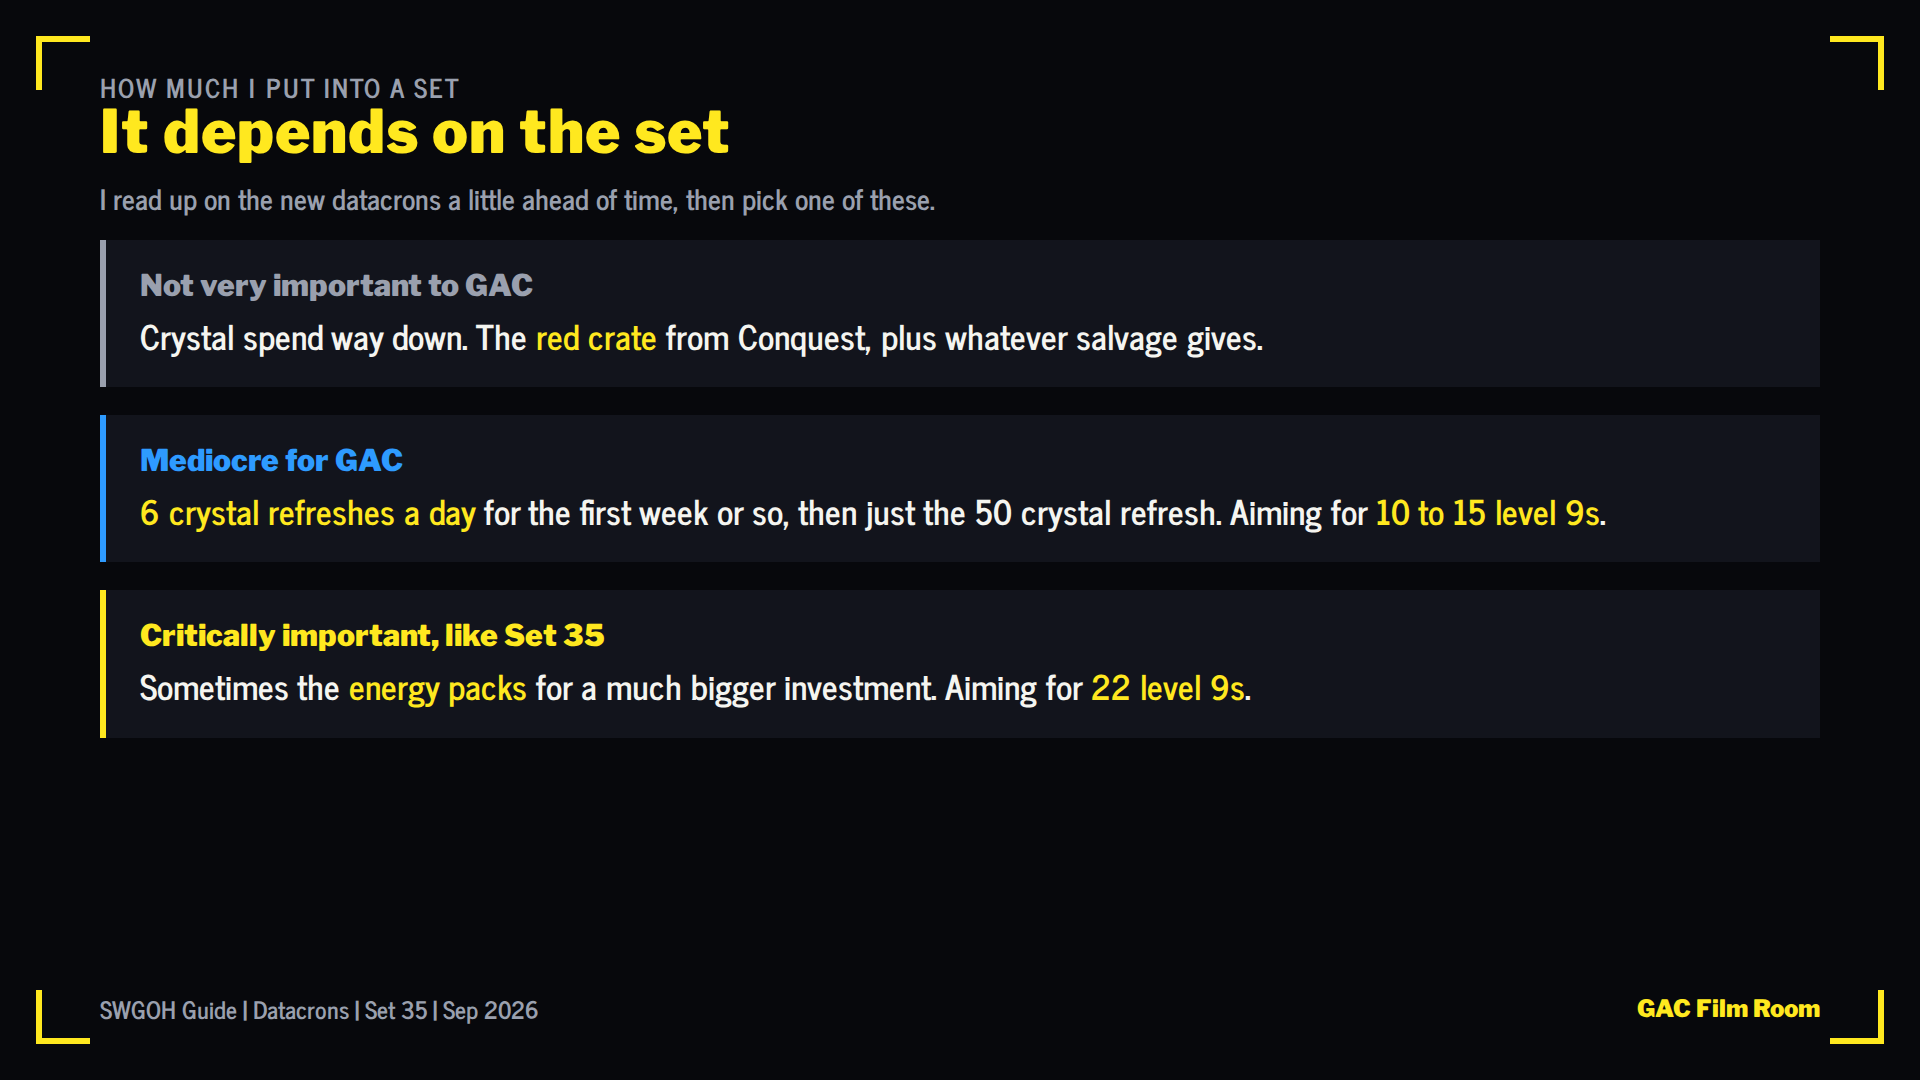
Before I start dumping resources into a set, I try to figure out how much I actually care about it for GAC. I basically put every set into one of three buckets:
- Not very important to GAC. Spend very few crystals. Get the red crate from Conquest, use whatever materials come naturally, dismantle the old set and move on.
- Mediocre for GAC. I'll usually do six crystal refreshes a day for roughly the first week, then drop down to the 50 crystal refresh for the rest of the set. I'm probably aiming for around 10 to 15 level 9s.
- Critically important. Set 35 is a good example. These are the sets where I'll buy some of the energy packs and make a much bigger investment. I'm aiming for around 22 level 9s.
This decision controls most of what comes afterward. There isn't much reason to farm every datacron set like it's the most important set of the year.
Step 2: Get through Sector 4 quickly

When Conquest opens, I rotate through my teams and push through Sector 4 as quickly as I reasonably can. Finishing Sector 4 gets you access to the datacron materials, and I want those unlocked early enough that I can start rolling datacrons.
Could I optimize this more? Absolutely. I don't feel like spending the first day of Conquest figuring out the perfect stamina rotation and feat efficiency. I push through Sector 4, get access to the materials, and then come back later to clean up whatever missions I need for the red crate.
Step 3: Keep spending your excess shards
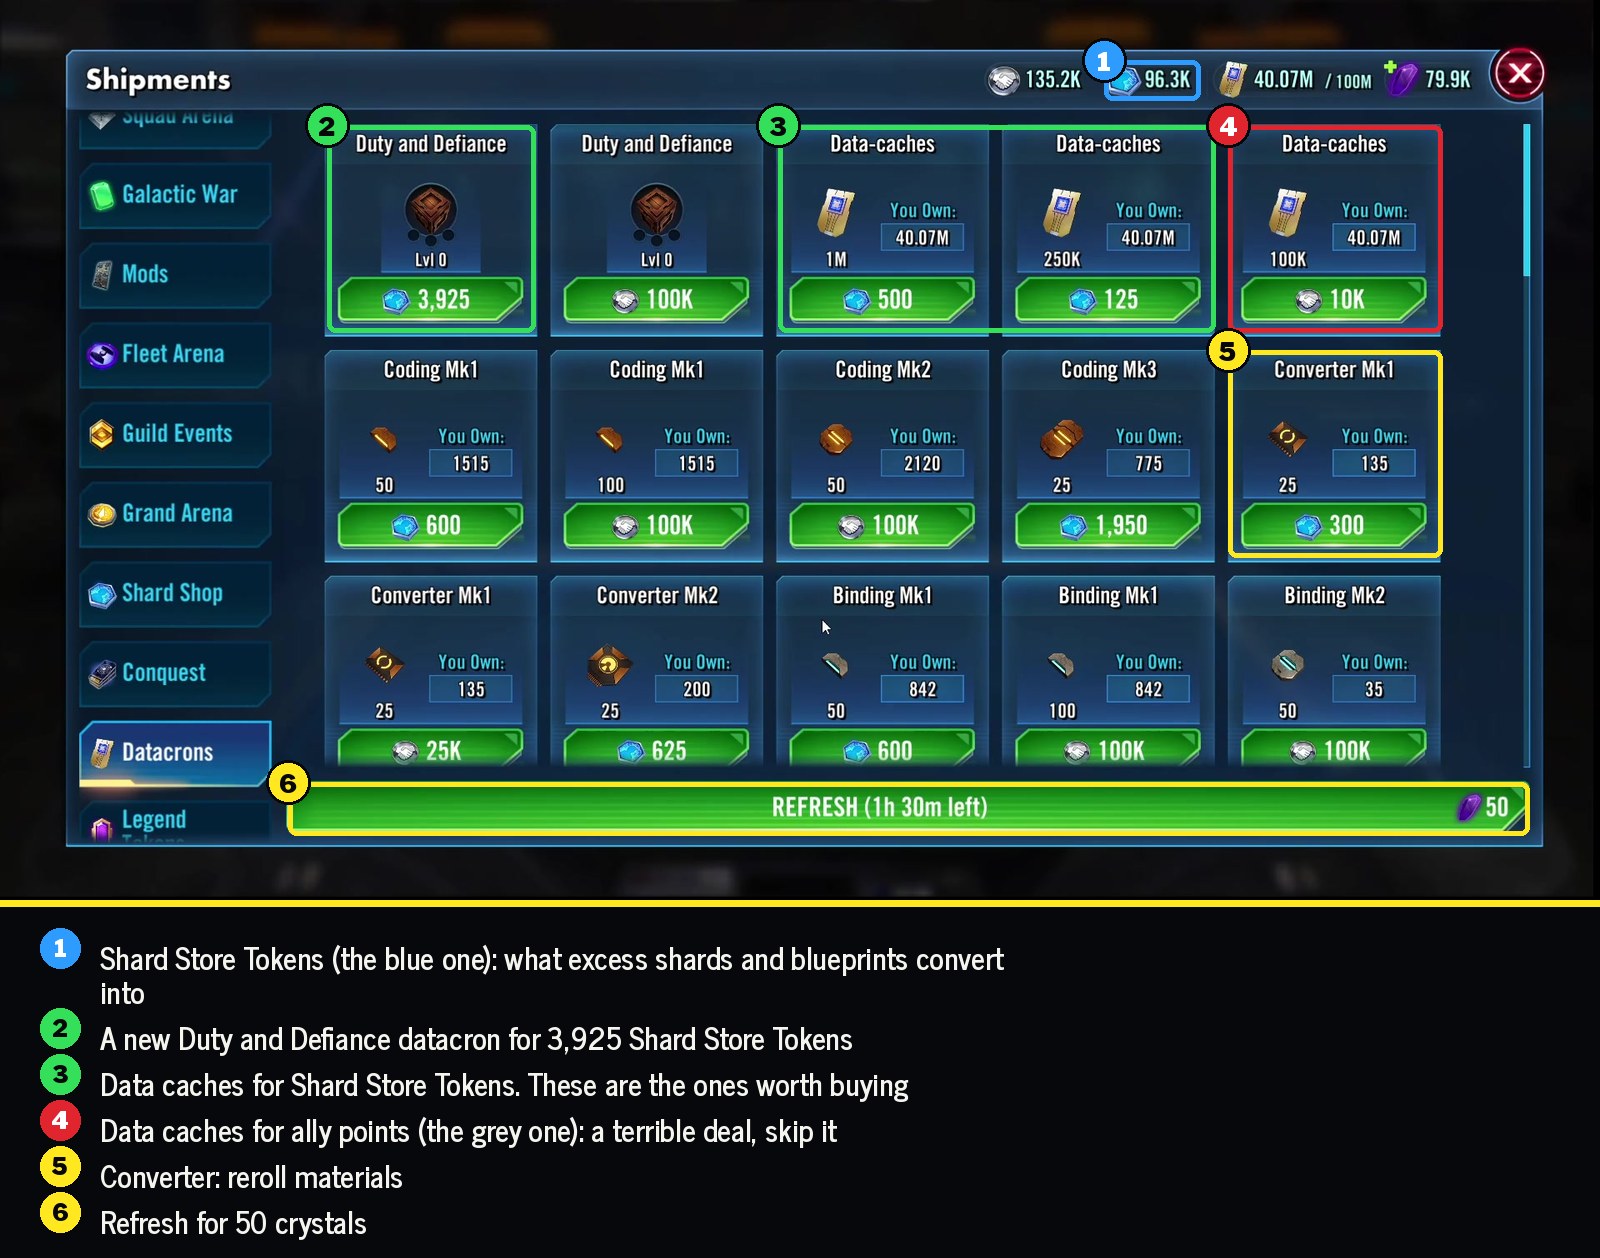
Convert your excess shards and blueprints into Shard Store Tokens and spend them in the Datacrons tab. This is where I get a huge amount of my data caches and reroll materials. Stick to the offers priced in Shard Store Tokens. The data caches sold for ally points are a terrible deal.
I don't wait until datacron week and suddenly try to buy everything. I spend this currency throughout the month and try to stay stocked up.
The obvious exception is if I'm intentionally saving for something. Right now I'm sitting on around 90,000 Shard Store Tokens because I'm waiting for the Galactic Legend Mando release. Otherwise, I want those excess shards doing something useful.
Step 4: Dismantle the old set
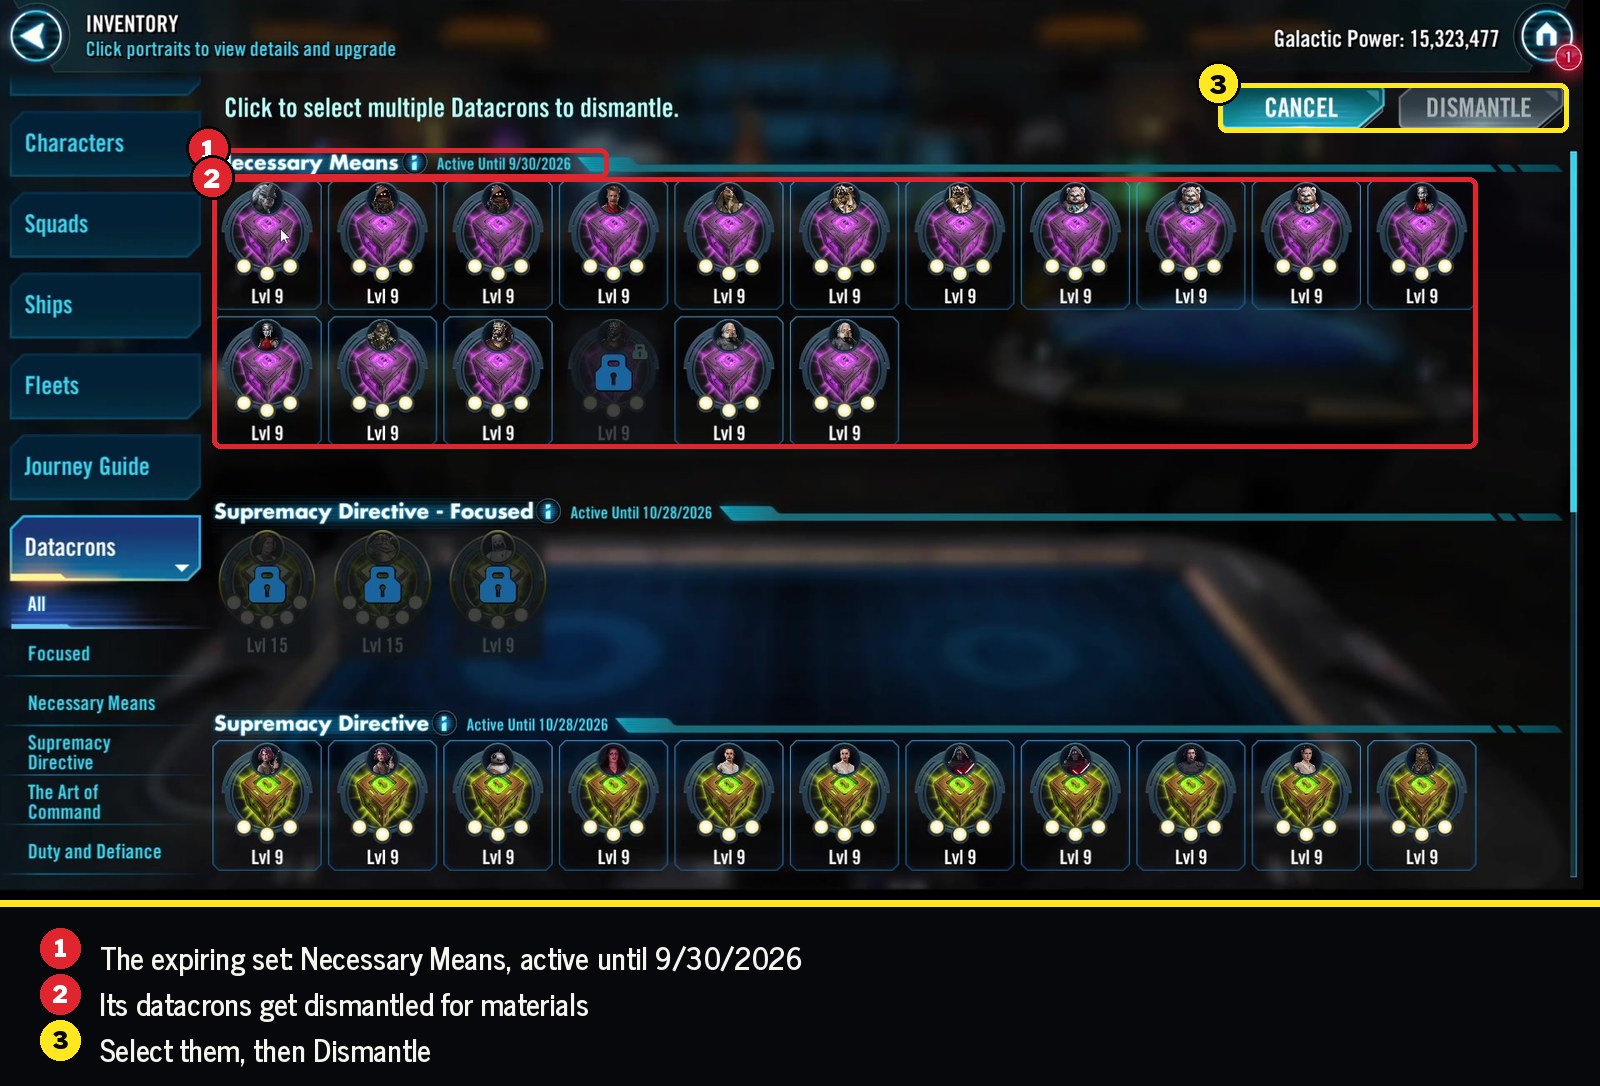
When a set is about to expire, dismantle the datacrons and recycle those materials into the new set. In the walkthrough, that's Necessary Means, which expires 9/30/2026.
There isn't much reason to leave resources sitting in a set that's about to disappear.
Step 5: Roll everything to level 3
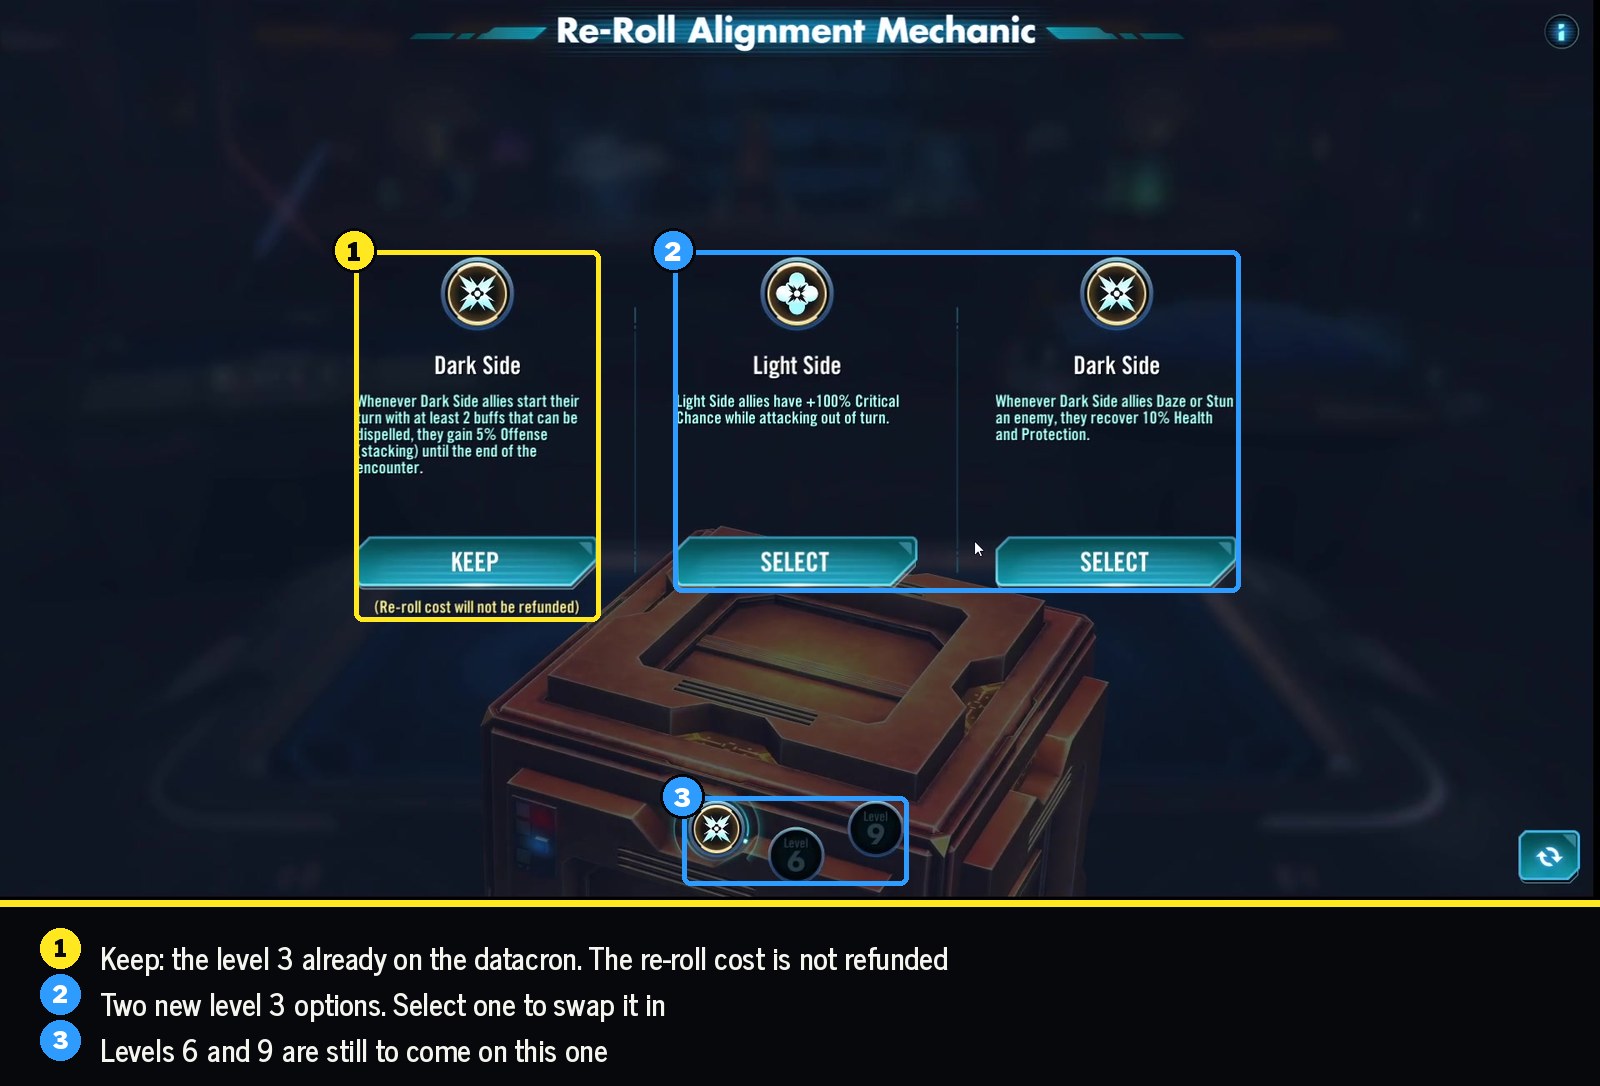
My goal is almost always level 9 datacrons. I start by taking new datacrons to level 3 and seeing what I've got.
For the stat levels, this is generally what I'm looking for, and I'm prioritizing these over basically everything else:
| Priority | Stat |
|---|---|
| 1 | Defense |
| 2 | Crit Damage |
| 3 | Health |
| 4 | Protection |
Then I look at the level 3 mechanic. For Set 35, I'm mostly chasing the Dark Side level 3: if there is no allied Galactic Legend, whenever Dark Side allies use an ability, all other buffed allies assist once per turn. I'm also perfectly happy taking the 15% Health and Protection mechanic.
If levels 1 and 2 are decent but I get the wrong level 3, I'll reroll the level 3.
If the entire datacron is garbage, I'm not going to keep dumping materials into it hoping it magically becomes good. I'll dismantle it and move on.
Step 6: Take the good ones to level 9
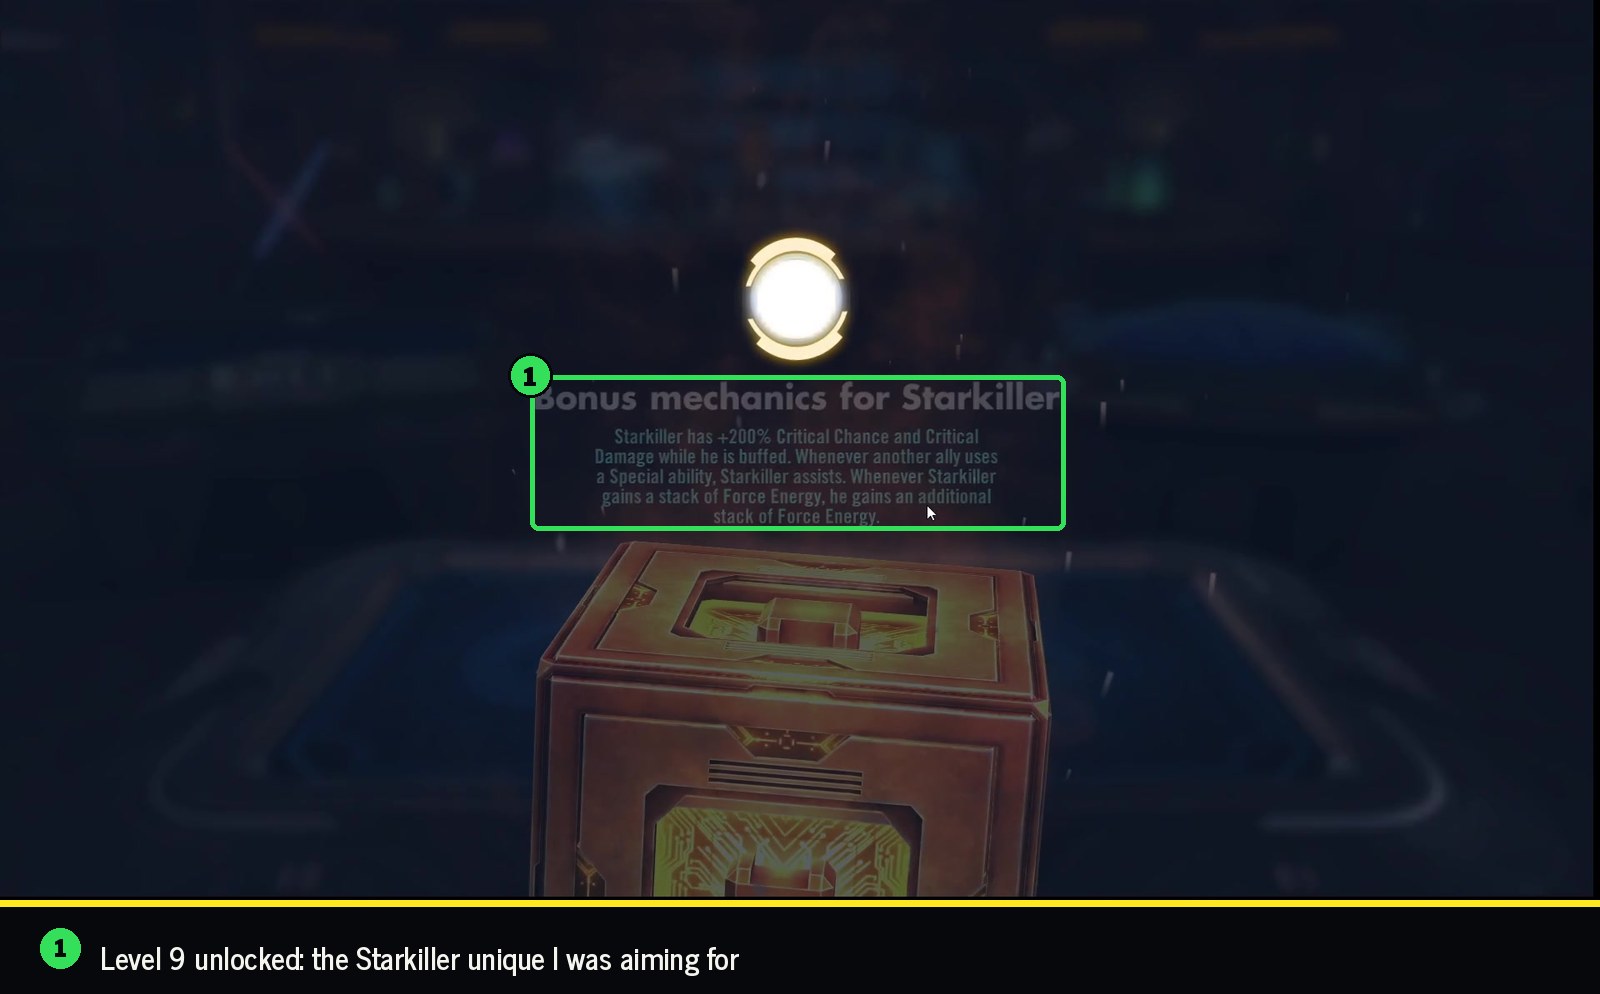
Once I've identified the datacrons worth keeping, I start pushing them to level 9. At this point I'm mostly trying to secure the character specific level 9s I care about. For Set 35, Starkiller was obviously one of those for my account.
I'm not trying to create the perfect finished datacron yet. I mainly want to get the right pieces in place.
Step 7: Fix the stats later
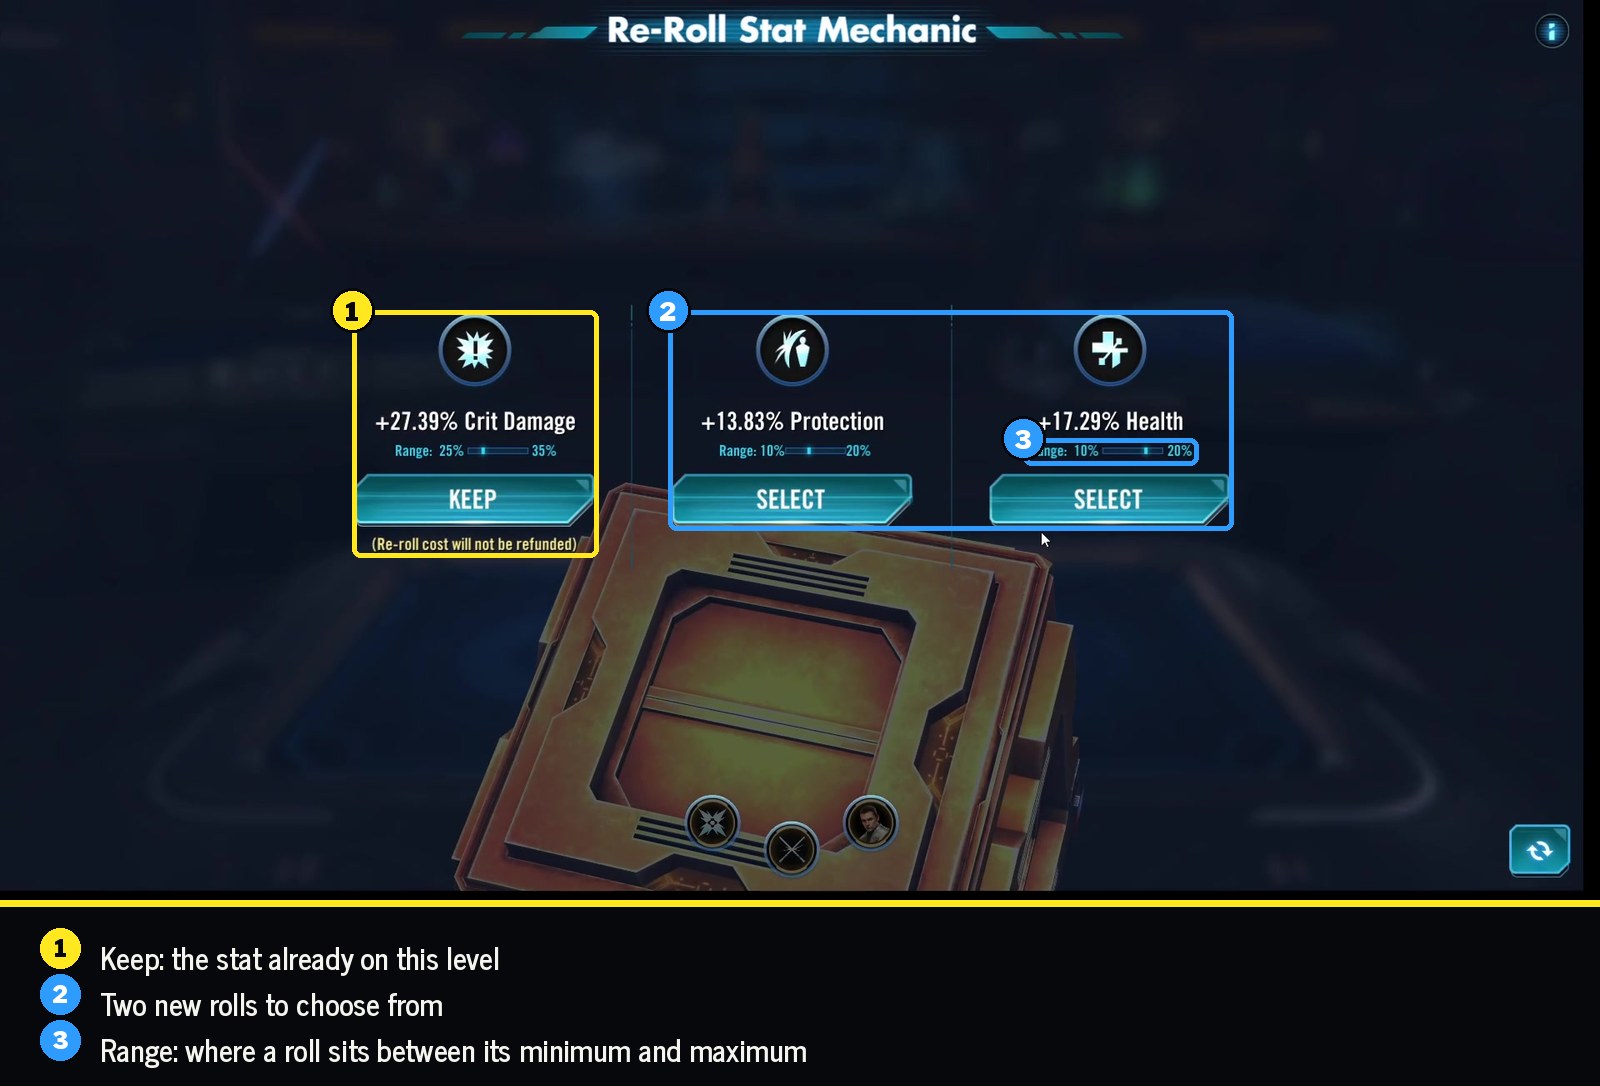
I save most of my stat rerolling for later in the season. Once I've built out my level 9s, I'll look at the best ones and start cleaning up their stats, especially heading into a GAC lock.
Past the first couple of cheap or free rerolls, I almost never spend heavily rerolling levels 7 through 9. That applies to both stats and chasing a specific level 9 like Starkiller or Maul. You can burn an enormous amount of resources trying to make one datacron perfect. I'd rather have a bunch of very good datacrons than destroy my resources trying to make one perfect one.
Also, the stat priority isn't an absolute rule. Look at what the datacron and character are actually doing.
On my Starkiller datacron, for example, I chose 17.29% Health instead of 27.39% Crit Damage at level 5. The level 9 already gives Starkiller a massive amount of damage. I think the scarier version of that team is the one where Starkiller is also difficult to kill. If you can't kill him quickly, he starts spiraling out of control.
The actual point of the system
Datacrons reset constantly, so I'm not interested in a system that requires me to obsess over every refresh, every reroll and every possible efficiency. I want something I can repeat.
Figure out how important the set is. Get through Conquest quickly enough to unlock the materials. Keep your shard currency working. Roll enough datacrons to find the good ones. Push those to level 9. Then clean up the best ones later.
You'll probably leave some efficiency on the table. That's fine. You're going to be doing this again next month.
Example: my Starkiller level 9

This is the Starkiller datacron I rolled during the first couple of days of Set 35:
| Level | Tier |
|---|---|
| 1 | +9.1% Protection |
| 2 | +49.26% Defense |
| 3 | Dark Side: if there is no allied Galactic Legend, whenever Dark Side allies use an ability, all other buffed allies assist once per turn |
| 4 | +59.54% Defense |
| 5 | +17.29% Health |
| 6 | Unaligned Force User: whenever an Unaligned Force User ally falls below 100% Health, they gain a bonus turn. Limit once per character per battle |
| 7 | +83.72% Defense |
| 8 | +26.25% Health |
| 9 | Starkiller has +200% Critical Chance and Critical Damage while he is buffed. Whenever another ally uses a Special ability, Starkiller assists. Whenever Starkiller gains a stack of Force Energy, he gains an additional stack of Force Energy |
I took it into Squad Arena for a quick test using The Stranger lead with Maul (Hate-Fueled), Starkiller, Cal Kestis and General Skywalker against Jedi Master Kenobi, General Skywalker, Commander Ahsoka Tano, Ahsoka Tano and General Kenobi.
It won with all five characters still alive and, from what I remember, basically full health and protection. That would have been full banners in GAC.
It's also only a couple of days into the set. I'll continue improving the datacron as the season goes on.
Quick reference
- Figure out how important the set is before you start spending.
- Push Conquest through Sector 4 quickly and worry about cleaning up feats afterward.
- Keep converting excess shards and buying datacron resources throughout the month.
- Dismantle the expiring set and recycle the materials.
- Roll new datacrons to level 3 and kill the bad ones early.
- Push the good ones to level 9 and secure the uniques you actually want.
- Save most of your stat rerolling for later in the season.
For what every level 3, 6 and 9 in the current set is worth, see the datacron cheat sheet.